Proper Desktop Ergonomics: A Simple Way to Stay Comfortable and Productive
Proper desktop ergonomics is one of the easiest steps you can take to enhance your comfort throughout the workday. When you’re more comfortable, you’ll not only feel better but also work more effectively.
How to Incorporate Desktop Ergonomics Into Your Office
Making your workstation more ergonomic doesn’t require a complete overhaul. Small adjustments can go a long way in reducing pain and increasing comfort. In this post, I’ll focus on practical tips for improving desktop ergonomics.
While I won’t dive into the specifics of setting up your office chair here, we have plenty of blog posts dedicated to choosing and setting up the perfect ergonomic office chair. Feel free to explore those for detailed guidance.
How to set up your desk
Your desk height plays a crucial role in maintaining comfort and preventing strain during your workday. To check, sit in your chair and slide yourself under the desk. Take note of how your body feels—there shouldn’t be any strain or discomfort.
Signs Your Desk Might Be Too Low:
- Overextended arms when using your mouse and keyboard.
- Leaning forward while working, causing strain on your back and neck.
Signs Your Desk Might Be Too High:
- Hunched shoulders, leading to tension and discomfort.
- Elbows positioned below the desk, creating awkward arm angles.
- Extended arms forward to reach your mouse and keyboard, resulting in unnecessary strain.
To ensure your desk is set to the optimal height, check out our YouTube video: “How High Should Your Desk Be When Sitting? Five Simple Steps to Get It Right.” This video provides practical tips to adjust your desk and create a more ergonomic workspace.
How to set up your equipment on your desktop
Having your desk equipment set up correctly is more important than you might think. Poor placement, such as a keyboard positioned too far back, can strain your body, leading to pain and discomfort. A simple solution is using working zones—an ergonomic guideline for organizing your desk effectively.
The working zones help prevent injuries, keep your desk neat, and improve overall productivity. By dividing your desk into three zones, you can ensure that everything you need is within the right reach.
Zone One: Closest to Your Body
Zone one includes the area of your desk closest to you, where items you use most often should be placed. Examples include:
- Mouse: Place it right next to your keyboard to avoid overreaching.
- Keyboard
- Notepad and pen
Tip for Your Mouse: A poorly positioned mouse can cause wrist strain or even carpal tunnel syndrome due to repetitive motions. Ensure your wrist maintains a natural alignment while using the mouse. Learn more about avoiding wrist pain in our blog post.
Zone Two: Within Arm’s Length
This zone is slightly further back, about an arm’s length away. Items you use frequently but not constantly should go here:
- Headphones or headset
- Drink or water bottle
- Paperwork
- Telephone
Zone Three: Farthest Away
Zone three is the back of your desk, for items you use rarely. This helps minimize clutter and keeps less-needed items out of the way. Examples include:
- Document folders
- Rarely used stationery
- Decorative items like picture frames or plants
For a complete guide on how to organize your desk using working zones, check out our workstation assessor and DSE expert Jo Blood’s YouTube video: “What is a working zone and how does it make an ergonomic workstation?.”
Where should your monitor/laptop go?
If you’re using a laptop, we strongly recommend pairing it with a laptop stand, along with a separate keyboard and mouse. Using a laptop without a stand can significantly harm your posture and health over time.
Why is using a laptop without a stand problematic?
The main issue lies in the low position of the laptop screen, which forces users to angle their heads downward to view it. This unnatural position places strain on the neck and shoulders, potentially leading to discomfort and long-term issues.
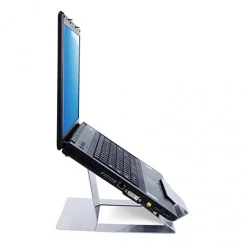
The Solution: A Laptop Stand
A laptop stand elevates the screen to eye level, encouraging a more ergonomic posture. When combined with a separate keyboard and mouse, it allows users to sit upright with their neck and back in a neutral position, reducing strain.
Below, we’ve highlighted common posture mistakes when using a laptop and included an example of the correct setup with a laptop stand for comparison.

Physiotherapist Nell Mead shared her professional insights on the potential risks of using laptops without a stand or external accessories. When asked why she isn’t a fan of laptops, Nell explained:
“Mainly because the screen is attached to the keyboard, so either it’s at the right height for your hands, or the right height for your face—or neither. Unless your spine is unfeasibly short, it can’t be both.
If you’re working at your kitchen table, your hands are likely to be too high; or if you’re working at your desk or on the coffee table, you’re likely to have dropped your head down too far. And when your hands and face are too close together for long periods, your spine gets stiff and compressed, and you run the risk of neck pain, back pain, RSI… etc.”
The Solution: A Laptop Stand and External Accessories
Nell also emphasized the importance of separating the keyboard from the screen when using a laptop as a desktop replacement:
“If you’re going to use a laptop as a desktop replacement, you need to separate the keyboard from the screen. That means getting a stand for your laptop so that the monitor is at the right height (your chin should be about level with the middle of the screen) and buying an external mouse and keyboard so that you’re also able to have your hands at the right height (around an inch lower than your elbows).”
Final Takeaway:
If you’re using a laptop in place of a desktop computer, a laptop stand is essential. This ensures your screen is at eye level and your hands are in an ergonomic position, reducing the risk of neck pain, back pain, and repetitive strain injuries.
-
 Addit Laptop Stand£65.00 (ex VAT)
Tips for setting up a laptop or a monitor screen:
The position of your screen plays a vital role in maintaining good posture and preventing eye strain. Here’s how to ensure your screen is at the ideal height and distance:
1. Screen Distance
Your screen should be at arm’s length away, but still close enough that you can touch it. To check, stretch your arms straight out in front of you—your fingertips should just reach the screen.
2. Screen Height
The top of your screen should be level with your eyes or aligned with the top of your eyebrows. This ensures that your neck remains in a neutral position, avoiding strain.
Why Proper Screen Placement Matters
Correctly positioning your screen reduces the risk of poor posture, neck strain, and eye fatigue. Making these adjustments is a simple yet effective way to improve your overall comfort while working.
Affordable Solutions
- Adjustable laptop stands or monitor arms are great tools for achieving the perfect screen position.
- Budget-friendly alternatives: Screen risers offer a low-cost option to lift your monitor or laptop.
- DIY solution: Use a stack of books to elevate your screen until it’s at the right height.
Need Help? Consider a DSE Assessment
If you’re struggling to identify what’s wrong with your workstation setup, a DSE (Display Screen Equipment) assessment might help. These assessments are easy to complete and cost as little as 99p. By answering a few simple questions, you can pinpoint the issues in your current setup and make the necessary adjustments.